









Creating a Minecraft Bedrock Dedicated Server is one of the best ways for people to build their own private world where their friends and families can enjoy it together. The good thing about creating this type of server is that it is completely free to download.
If you also want to customize your world with custom mobs, items, textures, weapons, blocks, or other gameplay features, you can use Minecraft Bedrock Add-Ons. Add-Ons generally work through Behavior Packs and Resource Packs, which can be connected to your server world.
In this guide, you will learn how to make a Bedrock dedicated server with add-ons step by step. The process covers downloading the server, creating the world, configuring the server, installing add-ons, connecting the packs to your world, testing everything, and troubleshooting common problems.
What Is a Bedrock Dedicated Server?
Bedrock Dedicated Server (BDS) is officially released server software in Minecraft that helps you host an independent multiplayer Bedrock Edition world apart from the main game client in Minecraft.
Unlike opening a regular single-player world in multiplayer mode, the dedicated server does not have to go offline once players join it. Hence, it is ideal for use by private groups, survival servers, mini-games, custom worlds, and multiplayer projects.
The official Minecraft server software can be downloaded for Windows and Ubuntu Linux operating systems. Official requirements for the current versions of the server software include Windows 10 version 10.0.15063 or higher, Windows Server 2016 or higher, or Ubuntu 22.04 LTS or higher for the Linux version.
A Bedrock Dedicated Server can also be modified using the server.properties file. The properties defined in this file include game mode, difficulty, maximum number of players, server port, view distance, tick distance, and the world name.
What Are Minecraft Bedrock Add-Ons?
Before learning how to make a Bedrock dedicated server with add-ons, it is important to understand what an Add-On actually does.
Minecraft Bedrock Add-Ons allow creators and server owners to customize parts of the game. Depending on the Add-On, you may be able to introduce new behaviors, modify entities, add custom items, change textures, create custom blocks, or modify gameplay.
There are two major types of packs:
- Behavior Packs
- Resource Packs
Behavior Packs control gameplay-related behavior. They can contain things such as entity behaviors, loot tables, recipes, spawn rules, items, and other gameplay components.
Resource Packs are generally responsible for visual and audio content, including textures, models, sounds, and other resources.
Many complete Add-Ons use both a Behavior Pack and a Resource Pack.
What You Need Before Starting
To create your server, prepare the following:
- A Windows or supported Linux computer/server
- Minecraft Bedrock Dedicated Server
- A stable internet connection
- Minecraft Bedrock Edition clients for your players
- A Bedrock-compatible Add-On
- Enough RAM and CPU resources for your expected player count
- A backup of your world
The official documentation lists 4 GBof RAM as part of the current system requirements, although actual resource needs can increase depending on your world, player count, and server configuration.
For a small private server, you do not necessarily need an extremely powerful machine. However, large worlds, many players, high view distances, and complicated Add-Ons can increase resource usage.
Step 1: Download Bedrock Dedicated Server
The first step in learning how to make a Bedrock Dedicated Server with add-ons is downloading the official Bedrock Dedicated Server software.
Go to the official Minecraft Bedrock Dedicated Server download page:
Minecraft Bedrock Dedicated Server Download
Download the appropriate version for your operating system.
For Windows, you will receive a compressed server package. Extract it into a new folder.
For example:
C:\Minecraft-Bedrock-Server
Keep the server files in their own folder. Avoid mixing them with unrelated Minecraft files.
Step 2: Start the Server for the First Time
After extracting the files, open the server folder.
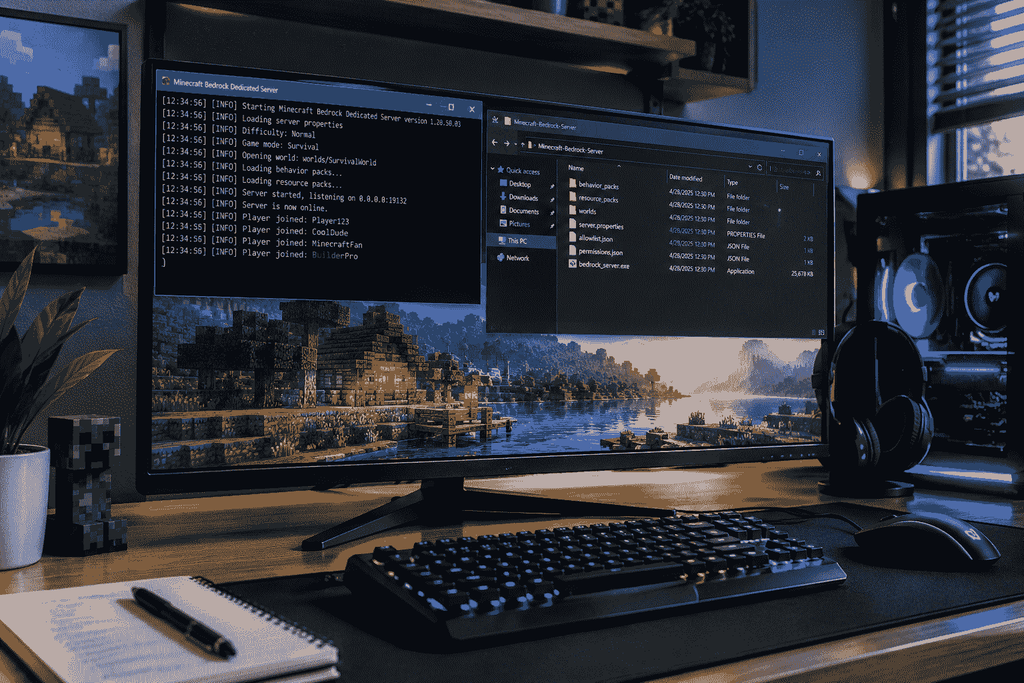
On Windows, locate the Bedrock server executable and launch it.
When the server starts for the first time, it creates important folders and configuration files.
Among the important folders are:
worlds
behavior_packs
resource_packs
The official documentation explains that the worlds folder stores server worlds, while shared behavior and resource packs can be placed in the corresponding pack folders.
Your folder may eventually look similar to this:
Minecraft-Bedrock-Server/
│
├── bedrock_server.exe
├── server.properties
├── allowlist.json
├── permissions.json
├── worlds/
├── behavior_packs/
├── resource_packs/
└── other server files
Do not delete files simply because you do not recognize them. Many are required by the server.
Step 3: Accept the Server Requirements
The server package may contain an EULA or configuration requirement that you need to review before the server can operate normally.
Open the relevant configuration file using Notepad.
Follow the instructions included with the official server package and save the changes.
After making changes, restart the server.
Step 4: Configure server.properties
One of the most important files is:
server.properties
This file controls many server settings. Microsoft describes it as an INI-style configuration file where settings are written as key-value pairs.
Open it with Notepad.
You may see settings similar to:
server-name=Dedicated Server
gamemode=survival
difficulty=normal
max-players=10
online-mode=true
allow-cheats=false
server-port=19132
view-distance=32
tick-distance=4
You can change these values according to your requirements.
For example:
server-name=My Addon Survival Server
gamemode=survival
difficulty=normal
max-players=10
online-mode=true
allow-cheats=false
The default Bedrock IPv4 server port is 19132.
If your server will be accessible over the internet, keep authentication enabled unless you have a specific reason to change it. Microsoft specifically recommends enabling online mode for internet-facing servers.
Step 5: Create Your Server World
Once the basic server configuration is ready, start the server.
The server will create a world automatically if you have not supplied an existing one.
The world is stored inside the:
worlds
folder.
The level-name property determines the world folder that the server uses.
For example:
level-name=MyAddonWorld
The corresponding world directory can be:
worlds/MyAddonWorld
If you already have a Bedrock world that you want to use, it can be copied into the server’s worlds directory. Microsoft documents copying existing Bedrock worlds to a Bedrock Dedicated Server.
Always create a backup before modifying an existing world.
Step 6: Choose a Bedrock Add-On
Now we reach the most important part of how to make a Bedrock dedicated server with add-ons.
You need a Bedrock-compatible Add-On.
An Add-On may contain:
- New mobs
- Custom items
- New weapons
- Custom blocks
- New textures
- Custom sounds
- Gameplay changes
- New recipes
- Custom animations
- New abilities
- Modified entity behavior
Make sure the Add-On is specifically compatible with your Minecraft Bedrock version.
This is important because an Add-On created for a different game version may fail to load or may cause errors.
Step 7: Understand Behavior Packs and Resource Packs
A common mistake is thinking every Add-On is just one file.
Some Add-Ons contain only a Behavior Pack. Others contain only a Resource Pack. Many complete Add-Ons require both.
A typical structure might look like:
MyAddon/
├── behavior_pack/
│ └── manifest.json
│
└── resource_pack/
└── manifest.json
The manifest.json file provides information that Minecraft uses to identify the pack, including its name, UUID, version, modules, and dependencies.
If an Add-On has both packs, you generally need to install both correctly.
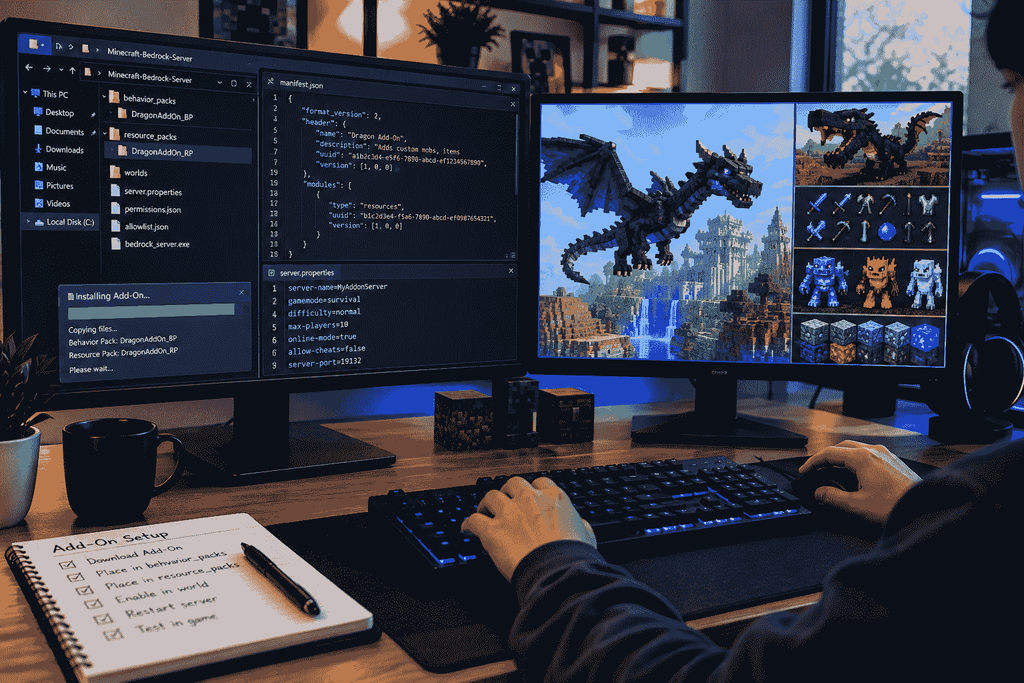
Step 8: Put the Add-On in the Server Folders
Stop your Bedrock server before changing pack files.
This is a good habit because modifying files while the server is running can create unexpected behavior.
For server-wide packs, place the Behavior Pack inside:
behavior_packs
and the Resource Pack inside:
resource_packs
For example:
Minecraft-Bedrock-Server/
│
├── behavior_packs/
│ └── MyAddonBehavior/
│
├── resource_packs/
│ └── MyAddonResources/
│
└── worlds/
However, simply placing packs into these folders does not necessarily mean the current world will automatically use them.
The world must have the appropriate packs enabled.
Step 9: Connect the Packs to Your World
This is one of the most important steps.
Normally, a Bedrock Add-On must be linked to the world in which the Add-On will be used.
According to the nature of the Add-On and the server configuration, there may be some pack configuration files in the world that specify which packs are currently in use.
That is why it is necessary to be guided by the Add-On instructions when installing the Add-On.
In case the Add-On contains both Behavior and Resource Packs, you must link both of them.
Some Add-Ons have even dependencies between Behavior and Resource Packs. According to Microsoft, it is good if cooperative Add-Ons have a dependency between the Behavior Pack and the Resource Pack to prevent users from using only one side of the Add-On.
Step 10: Check manifest.json
If your Add-On is not loading, check its:
manifest.json
This file is extremely important.
A manifest identifies the pack and contains information such as:
name
description
uuid
version
modules
dependencies
Microsoft’s current Add-On documentation explains that the manifest identifies the pack and can define dependencies between packs.
If a Behavior Pack depends on a Resource Pack, the dependency information must be correct.
Also make sure UUIDs are valid and unique.
Do not randomly change UUIDs unless you understand why you are changing them.
Step 11: Start the Server Again
After installing the Add-On and connecting the packs to the world, start your Bedrock Dedicated Server again.
Watch the server console carefully.
Look for:
- Pack loading messages
- JSON errors
- Missing dependencies
- Missing files
- Invalid UUID errors
- Script errors
- Resource errors
If the server starts normally, connect to it using a Bedrock Edition client.
Step 12: Connect to the Server
To connect from another device, you generally need the server’s IP address and Bedrock server port.
The standard IPv4 port is:
19132
According to the official server properties documentation.
For a local network, players can connect using the server computer’s local IP address.
For example:
192.168.1.100
For internet access, you may need to configure your router and firewall so external players can reach the server.
Only open the required port and avoid exposing unnecessary services to the internet.
Step 13: Test the Add-On
After joining the server, test the Add-On carefully.
If it adds a new mob, spawn or locate the mob.
If it adds items, check the inventory or recipes.
If it changes textures, check whether the new textures appear.
If it changes gameplay behavior, test the specific feature.
Testing one feature at a time makes troubleshooting much easier.
Step 14: Make Sure Players Have the Required Resources
Certain Add-Ons may have their client need custom resources to work properly.
In case you have a world that requires its Resource Pack, make sure to adjust the settings on your server accordingly to prevent entering the world without having the needed resources.
The Bedrock server supports a texturepack-required flag. When it is activated, the client will have to use the special texture pack of the world.
As an illustration:
texturepack-required=true
Such an option can be helpful for Add-Ons which heavily rely on custom textures.
Step 15: Improve Server Performance
Adding many Add-Ons can increase server workload.
Performance can be affected by:
- Number of players
- View distance
- Tick distance
- Custom entities
- Scripts
- Redstone activity
- Large farms
- World size
- Complex Add-Ons
- Server hardware
The view-distance setting controls the maximum number of chunks that can be visible, while tick-distance controls how far from players the world continues ticking. Higher values can increase performance requirements.
For a small server, start with moderate settings rather than immediately choosing extremely high values.
Step 16: Back Up Your Server
Backups are extremely important when using Add-Ons.
Before installing a new Add-On, make a copy of:
worlds/
You should also keep copies of your important configuration files and custom packs.
A simple backup structure could be:
Server-Backups/
├── World-Backup-01/
├── World-Backup-02/
└── Addon-Backup/
If an Add-On breaks the world, you can stop the server and restore the previous version.
Never assume that a world will always be recoverable after a major Add-On change.
Common Problems With Bedrock Add-Ons
Add-On Does Not Appear
If the Add-On does not appear, check:
- Correct folder location
- Correct pack structure
- manifest.json
- UUIDs
- Game version compatibility
- Dependencies
- Resource Pack installation
- Behavior Pack installation
Make sure you did not accidentally create an extra folder level.
For example, avoid:
behavior_packs/MyAddon/MyAddon/manifest.json
when the expected structure is:
behavior_packs/MyAddon/manifest.json
Add-On Loads but Features Do Not Work
This often means that one part of the Add-On is missing.
For example, a custom mob may require both:
Behavior Pack
+
Resource Pack
The Behavior Pack may control the mob’s behavior while the Resource Pack provides its appearance.
Check the Add-On documentation and manifest dependencies.
Server Crashes After Installing an Add-On
If the server crashes immediately after installing an Add-On:
- Stop the server.
- Remove the newly installed Add-On.
- Start the server again.
- Check whether the server works.
- If it does, investigate the Add-On.
- Check compatibility with your current Bedrock version.
- Review server logs.
Do not install several large Add-Ons at once when testing.
Install one Add-On, test it, and then install the next one.
Players Cannot See Custom Textures.
If players see missing textures or default textures, the Resource Pack may not be loading correctly.
Check:
resource_packs
Then verify the world is configured to use the Resource Pack.
Also check whether the Resource Pack has a dependency on the Behavior Pack or vice versa.
Using Multiple Add-Ons
You can build a more customized server by combining multiple Add-Ons.
For example, you might have:
Addon 1 = New Mobs
Addon 2 = New Weapons
Addon 3 = Furniture
Addon 4 = New Textures
However, more Add-Ons mean more opportunities for conflicts.
Two Add-Ons may attempt to modify the same entity, item, recipe, texture, or game system.
For this reason, test Add-Ons individually before combining them.
Pay special attention to:
- Pack dependencies
- UUIDs
- File conflicts
- Script conflicts
- Entity identifiers
- Version requirements
- Pack loading order
Useful Bedrock Server Settings
Here are several settings worth understanding:
| Setting | Purpose |
| server-name | Changes the server name |
| gamemode | Sets the default game mode |
| difficulty | Controls world difficulty |
| max-players | Controls maximum players |
| online-mode | Controls authentication behavior |
| allow-list | Restricts access to approved players |
| server-port | Sets the IPv4 server port |
| view-distance | Controls view distance |
| tick-distance | Controls simulation distance |
| level-name | Selects the active world |
| texturepack-required | Requires the world’s texture packs |
These settings are documented in Microsoft’s current Bedrock Dedicated Server properties reference.
Can You Create Your Own Bedrock Add-On?
Yes.
But if you wish to take a step further than installing existing Add-Ons, you can even develop your own Add-Ons.
The Bedrock documentation by Microsoft specifies that the process of developing Add-Ons normally includes working with Behavior Packs and Resource Packs. The use of JSON files is quite common while developing custom content.
A simple custom Add-On project might look like:
MyCustomAddon/
│
├── behavior_pack/
│ ├── manifest.json
│ ├── entities/
│ ├── items/
│ ├── recipes/
│ └── functions/
│
└── resource_pack/
├── manifest.json
├── textures/
├── models/
└── sounds/
You can start with a very small project and gradually learn more advanced features.
How to Keep Your Add-On Server Safe
If you are hosting a public server, security should also be considered.
Use:
- Strong server access controls
- The latest compatible server version
- Trusted Add-On sources
- Regular backups
- A private administrator account
- Appropriate firewall rules
- An allowlist for private servers
The Bedrock server supports an allowlist feature that can restrict connections to specified Xbox Live Gamertags.
For a private server with friends, an allowlist can be particularly useful.
Final Checklist
Before opening your server to players, check everything:
Server
- Bedrock Dedicated Server installed
- Server starts correctly
- server.properties configured
- World created
- Server port configured
- Firewall configured
Add-Ons
- Add-On supports your Bedrock version
- Behavior Pack installed
- Resource Pack installed
- manifest.json is valid
- Dependencies are correct
- World has the packs enabled
Testing
- Server starts without errors
- Players can connect
- Custom items work
- Custom mobs work
- Custom textures work
- Gameplay changes work
- Server performance is acceptable
Backup
- World backed up
- Add-Ons backed up
- Configuration backed up
Conclusion
Learning how to make a Bedrock dedicated server with add-ons may seem complicated at first, but the process becomes much easier when you break it into small steps.
To begin, download the Bedrock Dedicated Server and launch it once to create the needed folders. Next, configure server.properties, create or move the world you will be using, and prepare the Add-On you plan to use. Bedrock Add-Ons typically consist of Behavior Packs and Resource Packs, which you need to have both installed and linked to your world.
Finally, start the server, check if everything is working, debug the server console, and ensure that the Add-On works as expected and players can join. You should always back up the world before installing any big Add-On since incompatible packs can ruin the world. It is best for new users to install Add-Ons one at a time and try them before installing any more.
After you learn how to use Behavior Packs, Resource Packs, manifests, dependencies, and server settings, you will be able to create more customized Minecraft Bedrock multiplayer servers.